Crochet Basics
How to Make a Slip Knot and Foundation Chain
Learn how to crochet a chain from scratch — slip knot, foundation chain, counting your chains, and keeping even tension. Perfect for complete beginners.
Every crochet project in existence starts with two things: a slip knot and a foundation chain. That's it. Master these and you have the literal starting point for dishcloths, scarves, granny squares, amigurumi, all of it. This guide walks you through both steps in plain language, with the counting tip that trips up almost every beginner.
Step 1: Make a Slip Knot
The slip knot is how you attach your yarn to the hook. It needs to slide (that's the "slip" part) so you can adjust how snugly it sits.
What you need
- A crochet hook (size H/5mm is a good beginner size)
- Smooth, light-colored yarn in a worsted weight, lighter colors make it much easier to see your stitches
How to tie a slip knot
- Pull out about 6 inches of yarn from the skein. This "tail" just dangles; it's not part of your working yarn.
- Drape the yarn over your fingers to make a loop, with the tail hanging behind the loop and the yarn connected to the skein in front.
- Reach through the loop and pinch the strand connected to the skein (the "working yarn"). Pull a small bump of it through the loop, you've just formed a second loop inside the first.
- Slide that new loop onto your hook.
- Hold the tail in one hand and the working yarn in the other, then gently pull both ends outward until the knot snugs up against the hook shaft.
The knot should grip the hook but still slide along it easily. If it's so tight you can't move it at all, loosen it a little. If it falls off the hook on its own, tighten it slightly.
A quick sanity check
Tug the working yarn (the side connected to your skein). The loop should get smaller. Tug the tail. Nothing dramatic should happen, the knot just holds. If tugging the tail tightens the loop, you've looped in the wrong direction. Take it out and try again.
Step 2: Crochet Your Foundation Chain
The foundation chain (abbreviated ch in most patterns) is a row of interlocking loops. It sets the width of flat projects and the starting circumference of anything worked in the round.
How to hold the hook and yarn
There are two common hook grips: the pencil grip (hook resting between thumb and index finger like a pen) and the knife grip (hook cradled in your palm). Neither is wrong. Pick whichever feels less awkward after a few minutes of practice.
For the yarn hand, drape the working yarn over your index finger and weave it under your middle finger and over your ring finger. Your index finger controls tension while your thumb and middle finger pinch the work near the hook. This sounds complicated in writing; after five minutes of doing it, it becomes automatic.
Making each chain stitch
- Hold the hook in your dominant hand with the slip knot on it. Pinch the slip knot between your non-dominant thumb and middle finger.
- Yarn over: Swing the hook under the working yarn and catch it from below, so the yarn drapes over the hook from back to front.
- Pull through: Draw the hooked yarn through the loop already on your hook. You now have one new loop on the hook, that's one chain stitch made.
- Slide your pinching fingers up to hold the chain just below the hook, then repeat: yarn over, pull through.
Keep going until you have the number of chains your pattern calls for.
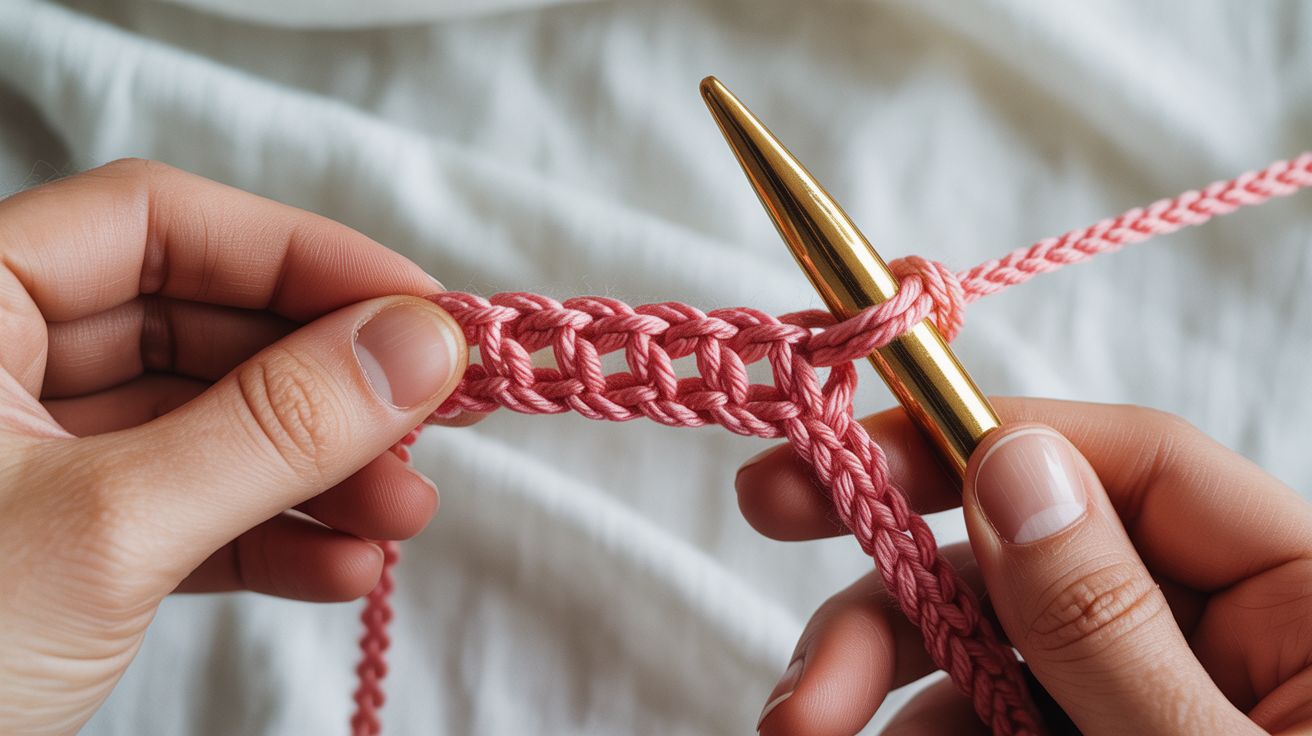
What the chain looks like
Looking at the front of the chain, you'll see a row of V shapes, each V is one chain stitch. The back of the chain has a little ridge (a "spine") running along it. Both sides are useful in different techniques, but for now just practice making the chain neat and even.
How to Count Your Chains Correctly
This is the single most common beginner mistake, so it gets its own section.
The loop sitting on your hook right now does NOT count as a chain. Neither does the slip knot at the far end. You count only the V shapes in between.
Counting in practice
Hold the chain so the front (V side) faces you. Starting from the hook end, count each V moving away from the hook: 1, 2, 3, and so on. Stop before you reach the slip knot.
If your pattern says "ch 10," you should count 10 V shapes between the hook and the slip knot. The loop on the hook is number zero, it becomes the first chain of the NEXT stitch you make.
A lot of beginners count the loop on the hook as chain 1, end up with one too many or one too few, and can't figure out why their row count never adds up. Forming the habit of not counting that loop saves a lot of frustration.
Keeping Even Tension
Tension means how loosely or tightly you're pulling the yarn as you work. Uneven tension produces chains that look wavy or lumpy, and it makes it hard to insert your hook cleanly when you start the first row.
Tips for consistent chains
- Aim for chains your hook slides through easily. If you have to wrestle your hook into a chain to start your first row, the chain is too tight. If the chains flop around with lots of extra slack, they're too loose. A comfortable in-between is what you're after.
- Don't grip the yarn too hard. A death grip on the working yarn creates tight, uneven stitches. Hold it firmly enough to control it, not firmly enough to strangle it.
- Try going up one hook size for your starting chain. Many experienced crocheters use a hook one size larger just for the foundation chain, then switch back for the body of the project. It's a small trick that makes the chain consistently easier to work into.
- Practice makes the muscle memory. Your first chain of 20 will probably look like a lumpy road. Your fifth chain of 20 will look noticeably better. Keep going.
The Turning Chain (A Brief Introduction)
Once you finish your foundation chain and are ready to start your first actual row of stitches, most patterns tell you to make a "turning chain", a certain number of extra chains added at the end before you flip your work and start row 1.
The turning chain gives your stitches enough height to stand up straight. Different stitch types need different turning chain lengths:
- Single crochet: 1 turning chain
- Half double crochet: 2 turning chains
- Double crochet: 3 turning chains
Your pattern will always specify this. For now, just know that those extra chains at the end of your foundation aren't a mistake; they're intentional. See our guide on how to single crochet for beginners for a full walkthrough of what happens after the chain.
Putting It All Together: Your First Chain
Here's a quick practice run to cement everything:
- Make a slip knot and place it on your hook.
- Yarn over, pull through, that's ch 1.
- Yarn over, pull through again, ch 2.
- Continue until you reach ch 15.
- Count your V shapes (not the loop on the hook, not the slip knot): you should have exactly 15.
- Look at your chain. Are the V shapes roughly the same size from one end to the other? If yes, your tension is working. If some are noticeably bigger or smaller, practice another chain and focus on keeping the same amount of yarn-draw on each stitch.
If you want to see how this chain leads into a real project, check out our beginner crochet guide for the full picture, or jump straight to learning the double crochet stitch once you're comfortable chaining.
Frequently Asked Questions
Why does my slip knot keep falling off the hook?
The knot is probably too loose. After putting it on the hook, tug the working yarn gently until the loop sits snugly against the shaft, not so tight it won't slide, but snug enough that gravity can't shake it loose.
My chains look twisted. Is that a problem?
A little twist is normal and nothing to worry about while you're practicing. As you get a feel for how to hold the chain, the twist tends to sort itself out. The main thing is that you can see and count the V shapes.
How tight should each chain stitch be?
Tight enough to hold its shape, loose enough that your hook slides through without force. A simple test: after making the chain, try to insert your hook into each loop from the previous row. If it goes in without much resistance, your tension is good.
Does the slip knot count as a chain stitch?
No. The slip knot anchors everything but isn't counted as a chain. When a pattern says "ch 20," you make 20 actual chain stitches after the slip knot.
What if I lose count while chaining?
Stop, hold the chain with the V side facing you, and recount from the hook end moving toward the tail. It's much easier to recount than to guess. Using a stitch marker every 10 chains can help on longer starting chains, just clip it onto chain 10, chain 20, and so on as you go.